• Home
  • About Me
    • My Bio
    • Sponsor Info
    • Giveaways
    • My Other Freelance Writing
    • Video Hello
    • blogging advice
  • Love + Relationships
    • Dating
    • Engagements
    • Letters to my future husband
    • Love Lounge
    • marriage
    • Memo To Men
    • Open Letters
    • Singlehood
    • virginity
    • Weddings
  • Fashion + Style
    • beauty
    • do or don’t
    • fashion
    • hair
    • jewelry
    • men’s fashion
    • women’s fashion
  • Art + Design
    • art
    • design
    • dream home
    • flowers
    • illustration
    • Photographs
    • posters
    • tattoos
    • typography
  • Disability Dialogue
    • body image
    • Dating
    • Dating With Disabilities
    • depression
    • disabilities in the media
    • Disability
  • Life + Leisure
    • babies
    • birthday
    • books
    • dream vacation
    • Entertainment and Media
    • etsy love
    • family
    • food
    • gift guide
    • holidays
    • In The Pursuit of Happiness
    • link love
    • magazines
    • Man Candy
    • movies
    • music
    • peek inside
    • Shopping
    • TV
    • would you rather

Thursday, October 9, 2014

Guest Post: The perfect outdoor activity for fall

If you’re not familiar with disc golf, here’s a little introduction: It’s a game that is very similar to golf except in place of a golf ball and club, the player uses a disc or Frisbee. The aim of this game is to score in each hole (or in this case, an elevated metal basket), by throwing the fewest number of discs. There are rumors that disc golf was invented in the early 1960s, but there is some evidence that the infamous flying disc game started as early as 1926 in a small Canadian Village called Baldworth located in the province of Saskatchewan.

Fast forward to the present, and disc golf has rapidly grown in popularity. This sport phenomenon is played in more than 40 countries and within eight years, the number of courses has nearly doubled. This game, originally considered as an all-male affair, is quickly becoming dominated by women. According to the 2006 Professional Disc Golf Association (PDGA) survey, out of its 11,300 members, roughly 900 are females.

The 2014 Grouse Mountain’s Disc Golf Tournament
The interest in Frisbee’s and flying discs is not dying down anytime soon. According to a recent online survey conducted by Web Perspectives, Grouse Mountains Disc Golf Tournament was of high interest…
*31% of participants surveyed were likely to attend the event.
*22% were very likely to attend Grouse Mountain.
*17% were highly unlikely to attend.
*9% unsure if they were attending.
*14% unlikely to attend.
*7% chose none of the options.

Golf’s Influence
When asked if participants were avid golfers, golf being the sport that started it all, 28% responded with rarely, 24% said seasonally, 17% said weekly, 14% said 1-2 times a week, 13% admitted to going bi-weekly, and 4% golf monthly. Overall, the participants surveyed seem to have a pretty big interest in the flying disc game and the tournament as a whole.

So what else is there to experience outside of participating in the sport itself at the Grouse Mountain Disc Golf Tournament? Grouse Mountain happens to offer a lot of interesting activities. The survey revealed that 40% were interested in all of the activities listed, 20% of participants were unsure, 16% partake in having breakfast with bears, another 16% would enjoy a helicopter tour, and 8% would go on an alpine experience.

Upcoming Disc Golf Tournaments
If this sport stands out to you, there are upcoming tournaments until December, with the season starting off again in April. With many locations all throughout North America, Canadians and Americans can both enjoy nature with a bit of competitive edge for everyone to enjoy!

If you would like to take part in an online survey like this one and earn gift vouchers, Web Perspectives offers an exciting opportunity to join a growing community!

(This post was sponsored by Tracy Dawkins, a freelance writer who specializes in music, health and entertainment. But she’s not limited to these subjects! Blessed a with quirky and engaging writing style, this journalism graduate has contributed to various music, entertainment and health Web sites over the past four years. Thanks so much for continuing to support So About What I Said’s wonderful sponsors!)

  • Facebook
  • Twitter
  • Pinterest
  • Email

Leave a Comment Filed Under: Entertainment and Media, guest post, Random Fun, sponsor spotlight, toys and games, Uncategorized

Wednesday, August 20, 2014

Guest Post: 6 Ways To Make Summer Last Longer

My, how quickly the summer months fly by. Soon the autumn leaves will fall, a crush of students will invade school hallways across the country and math exams will be doled out for good measure. Nevertheless, there is still time to cram in a few more days of summer fun before the moment arrives to crack open those textbooks. Not only is there still time, but there are also several ways to squeeze out every ounce of summer joy before the school bell rings, like Aeroplan partners, where you earn points to travel! Here are six ways to make the summer last just a little bit longer…

1. Right as the air starts to get nice and crisp, pick a day to spend hiking along a beautiful nature trail or extend the hike to a weekend excursion to include backpacking and camping. Speaking of camping, if funds are too low to spend on travel due to all of that shopping for school supplies and clothing, then pitching a tent in your own backyard can be just as exciting.

2. Movie night and popcorn has always been a family favorite pastime. Whether it’s an outing at the local movie theater or just gathering around the flat screen TV in the den, it does not matter. All you need are a bunch of DVDs and a microwave oven to pop plenty of popcorn.

3. Another way to enjoy a nice summer day is by playing a game of miniature golf. Fresh air, sunshine and a little exercise never hurt anyone.

4. Remember all those restaurant coupons received in the mail and newspaper circulars? Why not save time and energy otherwise devoted on cooking and menu planning and dine out a few nights a week or treat yourself to lunch.

5. A trip to an amusement park is a surefire way to cap off a memorable summer. In fact, going to the park before school begins may be right at the end of their peak season. One can’t go wrong with a last-minute vacation, especially when the costs are lower.

6. Everyone loves a barbecue. A “back-to-school cookout” is a great way to celebrate accomplishments and hopes for the future with family and friends. To make it even more interesting and memorable, have a theme. Throw a throwback to the ’70’s mixer complete with music and clothing from the era.

Summer is almost over…just almost. Carpe diem!

(This post was sponsored by Diane Langly, a home decor expert and enthusiast. When she’s not busy creating decorating ideas, she is writing about them. Her other passions include travel, food, family, and arts. Thanks so much for continuing to support So About What I Said’s wonderful sponsors!)

[Photos via We Heart It]

  • Facebook
  • Twitter
  • Pinterest
  • Email

Leave a Comment Filed Under: guest post, sponsor spotlight, summer 2014, summer pleasures, summer wish list, Uncategorized

Friday, August 1, 2014

Guest Post: 3 Tips for Decorating Your Space

Every year brings new decorating trends for the home. The hottest colors change as well as the patterns and types of decorations, specifically in home decor Canada that you might want to include. This year is no different as there will be some bold changes coming in how you can modernize your space…

Geometric Shapes
Instead of straight edges, step out of the box to use circles and other geometric shapes. These will look exotic in any room, and if you use the right depths of the shapes, you will create a futuristic look that is mind blowing. The shapes are ideal for light fixtures and on paintings. Wall decorations will also be an area where you can incorporate other shapes. Utilize 3-D design as well to make decorations pop off the wall instead of looking so plain.

Patterns
This will be a year of patterns. Whether it’s on sheets or walls, the top patterns will be flowers and letters. Hang a letter of the initial of the last name on a door, or display various phrases around the house, over fireplaces and above doors. This is the time when people want their home to tell a story instead of keeping boring walls that only have pictures on them. Colorful letters and flowers are ideal for a child’s room. They can be used on height charts or to display the name of the child on the wall. Floral patterns in colors of green and orange will likely be seen in living rooms. Brown is an option if you want to tie patterns together. Flowers shouldn’t be the small ones that you typically see in prints. The patterns will be large flowers that stand out. When you’re designing a living room or bedroom, strategically put a pattern on only one part of the wall, leaving the other walls a different color that matches.

Large Furniture
Get rid of the small chair, and go for something that is large and comfortable. Sectional couches are a hot-ticket item. You will also see a lot of overstuffed chairs made of leather with large pillows. Black and white with a vibrant background color will play out well in the home. Finish the room with a large rug in the center of the floor.

(This post was sponsored by Diane Langly, a home decor expert and enthusiast. When she’s not busy creating decorating ideas, she is writing about them. Her other passions include travel, food, family, and arts. Thanks so much for continuing to support So About What I Said’s wonderful sponsors!)

[Photos via We Heart It]

  • Facebook
  • Twitter
  • Pinterest
  • Email

1 Comment Filed Under: A Woman's Word, art, design, dream home, guest post, sponsor spotlight, summer 2014, Uncategorized

Friday, July 25, 2014

Guest Post: Preparing your space for creative projects

Simple as they may seem, both tape and measuring tape can play a major role in determining whether a project is a success or a failure. Using them in projects involves only minuscule costs and small amounts of effort, but can make your projects significantly easier and more successful. It may surprise you to know the difference these simple tools can make!

Painting
Few professional painters are caught without tape and measuring tape in their tool bags, and you shouldn’t be either. Use these handy tools to prevent your project from turning into a mess!


Make Stripes Sharp: Painted stripes create a striking effect, but getting them right can be tricky. Use a measuring tape to determine stripe width, and then use masking tape to mark off the stripes to be painted. The end result will be straight, clean, and striking painted stripes.

Keep Trim Pristine: Prior to beginning to paint any room, use a low-adhesive masking tape to cover the edges of trim, crown molding, door knobs, light switch plates and any other surfaces that should not have paint on them. When you’re done painting, simply pull the tape up from the surfaces.

Decorating
Though a measuring tape may be an expected part of a decorating arsenal, masking tape can play an equally important role. Use both as you embark on your next decorating project to prevent oversight.

Determine Fit: It’s easy to fall in love with a piece of furniture on the showroom floor, but all too often the piece doesn’t look right when brought home. Take a measuring tape with you while furniture shopping to determine if you have room for the piece in your home as well as whether the proportions fit with the scale of your other furniture.

Experiment with Placement: Use masking tape to outline the placement of furniture and artwork. If the placement is off, it will be much easier to move tape around than to lift heavy furniture or patch nail holes.

Organizing
Get Shelf Liner Right: Use your measuring tape to make certain fresh shelf liner is exactly the right size before cutting. You will save yourself from liner that comes up short.

Produce Quick Labels: Keep masking tape and a marker around to quickly label and organize anything. From pantry staples to shoe boxes, masking tape labels help you know exactly what everything contains.

(This post was sponsored by Elizabeth Donerson, a Canadian home decor expert and enthusiast. Thanks so much for continuing to support So About What I Said’s wonderful sponsors!)

[Photos via We Heart It]

  • Facebook
  • Twitter
  • Pinterest
  • Email

Leave a Comment Filed Under: design, dream home, guest post, sponsor spotlight, Uncategorized

Monday, July 7, 2014

Guest Post: Love beads and tie-dye decor

People are starting to decorate their homes in hippie summer style. You can get in on this trend yourself. You don’t need to buy expensive decor; in fact, you can make them yourself…

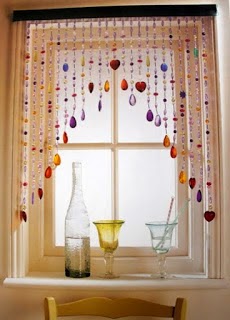
Love Beads as Window Valances
Stop at the craft store and buy several packages of beads in different sizes and styles. Pick up a few packages of beading cord along with a narrow length of fabric that you’ll connect the lengths of beads to. Arrange the beads in attractive arrangements, and then start stringing them on the cord. Cut cords of differing lengths so you get the shortest cords in the center of the valance and the longest cords on the outer edges. String the beads on and secure them by tying a tight knot on the end of each cord. Using needle and thread, sew each cord to the narrow fabric. Make two long rows of beads that you will use to hang your new valance to wall hangers.

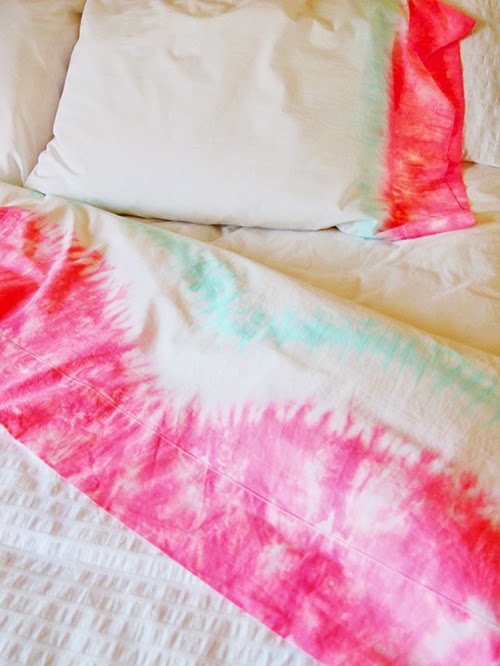
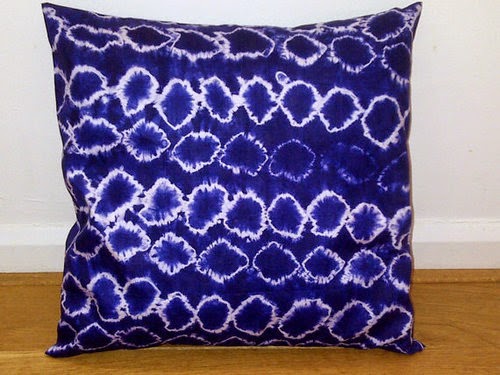
Tie-Dyed Couch Pillows
Buy colorful fabric dye in the colors you like. Gather several old, white T-shirts and rubber bands. Wrap the bands around different parts of the T-shirts. Mix up the dye in large bowls and dip different areas into the dye past the rubber bands. Allow areas of dye to overlap other areas. When you’re done, hang the dyed t-shirts outside to dry. When they have dried, cut the t-shirts to a size that allows you to wrap them around old pillows or pillow forms. Sew three sides together and put the pillow inside. Using a needle and thread, sew the new pillow cover together.

Tie-Dye Wall Tapestries
Use old, white bed sheets — using the above steps, tie-dye different areas of the bed sheet. When you have dyed the sheet in several areas, hang it outside to dry. Remove the rubber bands, turn one edge over and sew it closed, leaving the ends open. Slide a curtain rod into the channel you just made and hang it on a wall of your home. Another alternative is wire picture hangers, seamlessly hanging your creations without the leftover mess.

Window Covers
Buy colorful fabric — the more colorful, the better! Find a curtain rod wide enough to cover the window. Cut a length of fabric about 8 inches wide, and then cut this into pieces about 5 inches long. Sew hems on all four sides of the fabric. Take the small pieces of fabric and turn them wrong side out. Sew three sides closed and turn them inside out. Sew the fourth side closed and stitch them to the narrow end of the curtain. Slide the curtain rod into the hangers and hang your curtain up.

P.S. More fun how-to guest posts, including how to display DIY projects and romantic vacation ideas! :)

(This post was sponsored by Diane Langly, a home decor expert and enthusiast. When she’s not busy creating decorating ideas, she is writing about them. Her other passions include travel, food, family, and arts. Thanks so much for continuing to support So About What I Said’s wonderful sponsors!)

[Tie-dye photos via We Heart It; Love beads photo via Garden Web]

  • Facebook
  • Twitter
  • Pinterest
  • Email

Leave a Comment Filed Under: A Woman's Word, art, design, dream home, guest post, sponsor spotlight, summer 2014, Uncategorized

« Previous Page
Next Page »
So About What I Said is a daily blog that covers relationships, disabilities, lifestyle and pop culture. I love to laugh and have been known to overshare. I also have an unabashed obsession with pop music, polo shirts, and PEZ dispensers. Read more...

Let's Be Friends
Pinterest
Facebook
Twitter
Instagram
Bloglovin
RSS

Contact Me
Subscribe by Email

About Us

dotted lineAbout Us
archive

Archives

So About What I Said © 2026 · Design by Maiedae · Development by High Note Designs

loading Cancel
Post was not sent - check your email addresses!
Email check failed, please try again
Sorry, your blog cannot share posts by email.